初识 Transformer
2018年google发表了BERT模型并横扫了NLP领域11项任务,而BERT中Transformer发挥了重要作用,使得Transformer架构流行起来
Transformer 的优势
RNN、LSTM、GRU 处理长文本存在梯度消失,计算慢,无法并行
- Transformer 能够利用分布式GPU进行并行训练,提升模型训练效率
- 在分析预测长文本时,捕捉间隔较长的语义关联效果更好
Transformer 架构
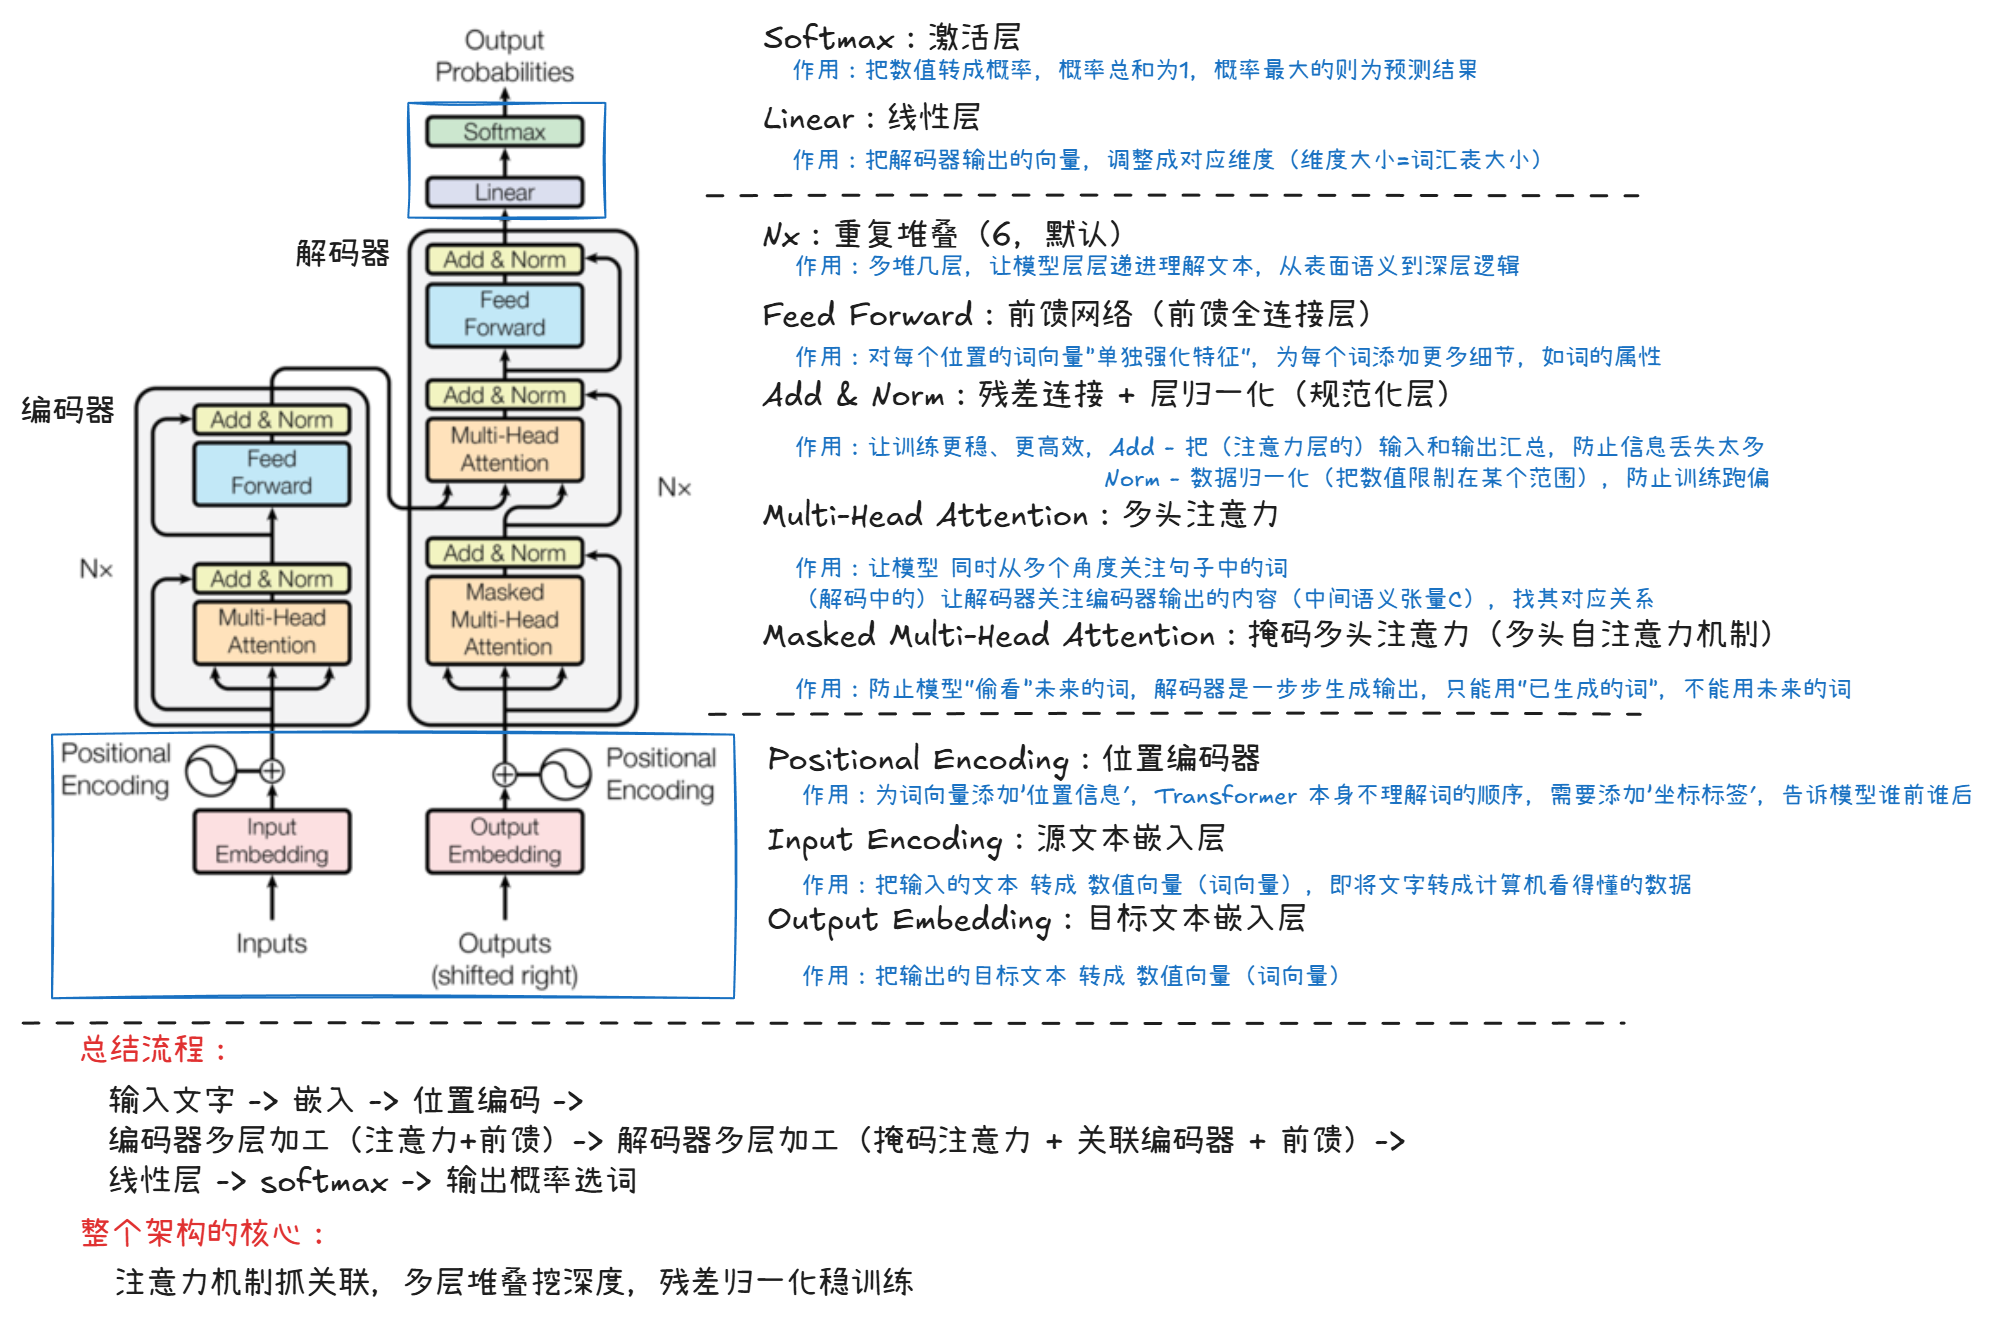
组件
import copy
import math
import torch
import torch.nn as nn
import torch.nn.functional as F
import numpy as np
import matplotlib.pyplot as plt
词嵌入层
# 词嵌入层
class Embedding(nn.Module):
    def __init__(self, vocab_size, embed_dim):
        """
        :param vocab_size: 词汇表大小
        :param embed_dim: 词嵌入的维度
        """
        super().__init__()
        self.vocab_size = vocab_size
        self.embed_dim = embed_dim
        self.embedding = nn.Embedding(vocab_size, embed_dim)

    def forward(self, x):
        # 进行缩放:输入词的词向量 * √词嵌入的维度
        # 目的:平衡梯度,避免梯度爆炸或者梯度消失
        return self.embedding(x) * math.sqrt(self.embed_dim)
位置编码
核心作用:
Transformer 是并行处理所有词的,模型不知道词的前后顺序,需要给每个词加上一个“位置编号”,让模型知道这个词在句子中的第几个位置
位置编码通过什么生成
Transformer 编码位置信息:使用 正弦函数和余弦函数 生成
偶数维度用sin,奇数维度用cos
其中:
:位置(第几个词), :维度索引(从 开始, 需要覆盖词向量的全部维度), :词向量的维度
:周期缩放因子,不同的 会让周期不一样( 越大,周期越长)
使用三角函数的优点:位置 的编码 位置 的编码的 线性组合(简单的乘加运算),不是每个位置都要重算三角函数
为什么能做到,因为三角函数
对应 相关的部分, 对应 相关的部分
(面试)位置编码的好处或目的:
- 能够记住词的顺序,通过周期性函数,给每个位置添加标签,让模型能够知道词的先后顺序,比如“我爱你”和“你爱我”
- 计算高效,靠线性组合推导性位置编码,不用计算三角函数,省算力
- 适应任意长度,不管句子多长,随时能算编码,泛化能力强
- 模型处理语言时,更聪明,更灵活
例子
假设词向量维度为4,即每个位置的编码是一个4维向量。
维度为4时, 取 和 。
当 时:
:
- 第0维:
- 第1维:
:
- 第2维:
- 第3维:
因此,位置 的4维位置编码向量为:
数值近似为:
# 位置编码
class PositionalEncoding(nn.Module):
    def __init__(self, d_model, dropout, max_len=60):
        """
        :param d_model: 词向量的维度(词嵌入的维度), 512
        :param dropout: 随机失活概率
        :param max_len: 最大序列长度, 60
        """
        super().__init__()
        self.dropout = nn.Dropout(dropout)
        pe = torch.zeros(max_len, d_model)  # Positional Encoding,存放位置编码信息
        position = torch.arange(0, max_len, dtype=torch.float).unsqueeze(1)  # 位置索引 shape=[max_len, 1]
        # 1/10000^(2i/d_model) = 1/e^( (2i/d_model)*(ln(10000) ) =  e^(2i* (-ln(10000)/d_model)) )
        # torch.arange(0, d_model, 2) -> [0, 2, 4, 6, 8, ..., d_model-2] 偶数维度,+1 变成奇数维度
        div_term = torch.exp(torch.arange(0, d_model, 2).float() * (-math.log(10000.0) / d_model))  # 1/周期缩放因子 shape=[1, d_model/2]
        position_values = position * div_term  # 位置索引 * 1/周期缩放因子 shape=[max_len, d_model/2] -> [60, 512]
        pe[:, 0::2] = torch.sin(position_values)  # 偶数维度
        pe[:, 1::2] = torch.cos(position_values)  # 奇数维度
        pe = pe.unsqueeze(0)  # 升维:添加 batch_size 维度 shape=[1, 60, 512]
        self.register_buffer('pe', pe)  # 缓存位置编码信息, 避免每次训练时重新计算
【扩展】绘制词汇向量中特征的分布曲线
# 可视化位置编码
def plot_position_encoding():
    pe = PositionalEncoding(d_model=20, dropout=0.1, max_len=100)
    x = torch.zeros(1, 100, 20)  # [batch_size, seq_len, d_model]
    y = pe(x)  # shape=[1, 100, 20]
    # 绘图
    plt.figure(figsize=(20, 10))
    plt.plot(np.arange(100), y[0, :, 4:8].detach().numpy())
    plt.legend([f'dim {p}'for p in [4, 5, 6, 7]])
    plt.show()
【扩展】掩码张量
掩码张量是一个由 0 和 1 组成的张量,用于在 Transformer 等模型中遮挡或替换另一张量的部分数值,避免模型在训练时提前利用未来信息,保证生成逻辑的合理性。
import torch
import numpy as np
import matplotlib.pyplot as plt

# 上三角矩阵
def np_triu(x):
    arr = np.ones((x, x))
    print(arr)  # 创建一个行列一致的矩阵
    # print(np.triu(arr, 1))  # 对角线上移
    # print(np.triu(arr, -1)) # 对角线下移
    return np.triu(arr)

x = 5
up_trius = torch.triu(torch.ones((x, x)))  # 上三角矩阵
print(up_trius)
low_trius = torch.from_numpy(1 - np.triu(np.ones((x, x)), 1))  # 下三角矩阵
print(low_trius.data)

# 掩码张量可视化
def plot_mask(mask):
    plt.figure(figsize=(5, 5))
    plt.imshow(mask)
    plt.show()

plot_mask(torch.triu(torch.ones((10, 10))))
# 黄色(1)代表没有被遮掩, 紫色(0)代表被遮掩的信息
# 横坐标:目标词汇的位置, 纵坐标:可查看的位置
多头注意力机制
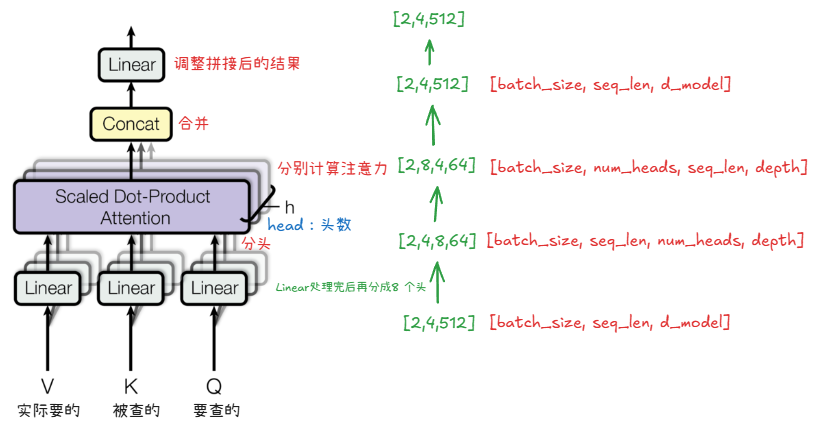
多头注意力机制,是将经线性变换得到的Q、K、V张量沿词嵌入维度切分为多个头,分别独立执行注意力计算后再融合结果,以此捕获序列不同表示子空间的语义与依赖关系的注意力机制。
# 注意力计算
def attention(query, key, value, mask=None, dropout=None):
    """
    计算注意力
    :param query: 查询张量, shape=[batch_size, seq_len, d_model]
    :param key: 键张量, shape=[batch_size, seq_len, d_model]
    :param value: 值张量, shape=[batch_size, seq_len, d_model]
    :param mask: 掩码张量, shape一般和 score 匹配
    :param dropout: 随机失活,防止过拟合
    :return: 输出张量(融合信息) 和 注意力权重
    """
    # 自注意力公式:softmax(Q * K^T / sqrt(d_k)) * V
    d_k = query.size(-1)  # 获取Q的特征维度(最后一个维度 d_model)
    scores = torch.matmul(query, key.transpose(-2, -1)) / math.sqrt(d_k)
    # 掩码处理(可选),处理后再进行softmax的权重会接近于0
    if mask is not None:
        scores = scores.masked_fill(mask == 0, -1e9)
    p_attn = F.softmax(scores, dim=-1)
    # 随机失活处理
    if dropout is not None:
        p_attn = dropout(p_attn)
    return torch.matmul(p_attn, value), p_attn
模块克隆
# 克隆模块
def clones(module, N):
    """
    创建N个相同的模块,深拷贝,每个模块的参数都是独立的
    :param module: 被克隆的模块
    :param N: 堆叠的层数
    :return: 有N个相同模块的ModuleList
    """
    return nn.ModuleList([copy.deepcopy(module) for _ in range(N)])
多头注意力机制
# 多头注意力机制
# 把词向量维度映射到多个头,并行计算多个头,最后再拼接起来
class MultiHeadAttention(nn.Module):
    def __init__(self, d_model, num_heads, dropout_p=0.1):
        super().__init__()
        self.num_heads = num_heads
        self.d_model = d_model
        # 分头
        assert d_model % num_heads == 0  # 维度必须可以被头数整除
        self.depth = d_model // num_heads  # 每个头的词嵌入维度
        # 4个线性层
        self.linears = clones(nn.Linear(d_model, d_model), 4)
        # dropout
        self.dropout = nn.Dropout(dropout_p)
        # 注意力权重
        self.attn = None

    def forward(self, query, key, value, mask=None):
        # query, key, value: [batch_size, seq_len, d_model]
        # mask: [batch_size, seq_len, seq_len]
        # 是否需要掩码
        if mask is not None:
            mask = mask.unsqueeze(0)
        # 获取批量大小
        batch_size = query.size(0)
        # 线性变化
        # [model(x) for model, x in zip(...)] 取前 3 个linear 分别对应给 Q、K、V 做线性变换
        # view() 将d_model拆成 num_heads × depth ,目的:分头
        #       [batch_size, seq_len, d_model] -> [batch_size, seq_len, num_heads, depth]
        #                          [2, 4, 512] -> [2, 4, 8, 64]
        # transpose() 交换维度,目的:让 seq_len, depth 紧贴一起,方便后续计算注意力
        #       [batch_size, seq_len, num_heads, depth] -> [batch_size, num_heads, seq_len, depth]
        #                                 [2, 4, 8, 64] -> [2, 8, 4, 64]
        query, key, value = [
            model(x).view(batch_size, -1, self.num_heads, self.depth).transpose(1, 2)
            for model, x in zip(self.linears, (query, key, value))
        ]
        # 多头注意力计算
        # 注意力输出、注意力权重:[batch_size, num_heads, seq_len, depth]、[batch_size, num_heads, seq_len, seq_len]
        x, self.attn = attention(query, key, value, mask, self.dropout)
        # 合并多头:[batch_size, seq_len, num_heads, depth] -> [batch_size, seq_len, d_model]
        x = x.transpose(1, 2).contiguous().view(batch_size, -1, self.num_heads * self.depth)
        # 线性变换
        return self.linears[-1](x)
前馈全连接层
在Transformer中前馈全连接层就是具有两层线性层的全连接网络 考虑注意力机制可能对复杂过程的拟合程度不够, 通过增加两层网络来增强模型的能力
# 前馈全连接层
class FeedForward(nn.Module):
    def __init__(self, d_model, d_ff, dropout=0.1):
        super().__init__()
        self.fc1 = nn.Linear(d_model, d_ff)
        self.fc2 = nn.Linear(d_ff, d_model)
        self.dropout = nn.Dropout(dropout)
    def forward(self, x):
        x = self.fc1(x)
        x = self.dropout(F.relu(x))
        x = self.fc2(x)
        return x
规范化层
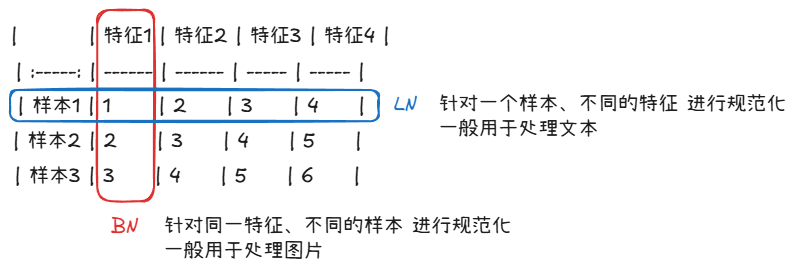
核心目的:解决深度神经网络训练中的内部协变量偏移问题 深层网络经过多层计算后参数可能会出现过大或过小的情况,这会导致学习过程出现异常、模型收敛缓慢 通过规范层对数值进行规范化,使其特征数值在合理范围内,能有效缓解深层网络堆叠带来的数值不稳定问题 在Transformer中,该模块通常由层归一化(Layer Normalization)实现
BN和LN的区别:
# 规范化层
class LayerNorm(nn.Module):
    def __init__(self, features, eps=1e-6):
        """
        :param features: 词嵌入维度(特征数)
        :param eps: 小常数,避免除零(分母为零)
        """
        super().__init__()
        # 线性公式:y = a * x + b
        # a: 对标准化后的数据进行缩放,b: 对标准化后的数据进行平移
        self.a = nn.Parameter(torch.ones(features))   # 可学习的缩放系数
        self.b = nn.Parameter(torch.zeros(features))  # 可学习的平移系数
        self.eps = eps

    def forward(self, x):
        x_mean = x.mean(-1, keepdim=True)  # 计算每个样本(最后一个维度,词嵌入维度)的 均值
        x_std = x.std(-1, keepdim=True)    # 计算每个样本(最后一个维度,词嵌入维度)的 标准差
        return self.a * (x - x_mean) / (x_std + self.eps) + self.b  # 规范化后的结果
子层连接
编码器由两个子层堆叠而成:多头自注意力子层(Multi-Head Self-Attention)和前馈神经网络子层(Feed-Forward Network)。每个子层后面都跟随残差连接和层归一化操作。
import torch.nn as nn
from element import *# 构建子层
class SublayerConnection(nn.Module):
def __init__(self, d_model, dropout=0.1):
super().__init__()
# 规范化层(层归一化)
self.norm = nn.LayerNorm(d_model)
# 随机失活
self.dropout = nn.Dropout(dropout)
def forward(self, x, sublayer):
# x: 输入张量 [batch_size, seq_len, d_model]
# sublayer: 子层对象(如:多头注意力层、前馈全连接层等)
# 方式一:先子层处理,再规范化层处理,最后随机失活并残差连接
result1 = x + self.dropout(self.norm(sublayer(x)))
# 方式二:先规范化层处理,再子层处理,最后随机失活并残差连接
# result2 = x + self.dropout(sublayer(self.norm(x)))
return result1# 编码器层
class EncoderLayer(nn.Module):
def __init__(self, d_model, attn_obj, feed_forward, dropout=0.1):
super().__init__()
self.d_model = d_model # 词嵌入维度
self.attn_obj = attn_obj # 注意力对象
self.feed_forward = feed_forward # 前馈全连接对象
self.sublayer = clones(SublayerConnection(d_model, dropout), 2) # 克隆子层(2个)
def forward(self, x, mask):
# 第1个子层(多头自注意力层)
x = self.sublayer[0](x, lambda x: self.attn_obj(x, x, x, mask))
# 第2个子层(前馈全连接层)
x = self.sublayer[1](x, lambda x: self.feed_forward(x))
return x# 解码器层
class DecoderLayer(nn.Module):
def __init__(self, d_model, mask_attn, attn, feed_forward, dropout=0.1):
super().__init__()
self.d_model = d_model # 词向量维度
self.mask_attn = mask_attn # 掩码多头注意力
self.attn = attn # 多头注意力
self.feed_forward = feed_forward # 前馈全连接层
self.sublayer = clones(SublayerConnection(d_model, dropout), 3) # 3个子层连接
def forward(self, x, encoder_output, source_mask, target_mask):
"""
:param x: 解码器的输入,即 源序列 的词嵌入+位置编码
:param encoder_ouyput: 编码器的输出,即 源序列 的词嵌入+位置编码
:param source_mask: 源序列 的掩码,用于 编码器-解码器 注意力
:param target_mask: 目标序列 的掩码,用于 自注意力
:return: 解码器的输出,即目标序列 的词嵌入+位置编码
"""
# 第1个子层(多头自注意力层)
x = self.sublayer[0](x, lambda x: self.mask_attn(x, x, x, target_mask))
# 第2个子层(多头注意力层)
x = self.sublayer[1](x, lambda x: self.attn(x, encoder_output, encoder_output, source_mask))
# 第3个子层(前馈全连接层)
x = self.sublayer[2](x, lambda x: self.feed_forward(x))
return x编码器和解码器
import copy
import torch.nn.functional as F
from element import *
from sublayer import *# 编码器
class Encoder(nn.Module):
def __init__(self, layer, N):
super().__init__()
self.layers = clones(layer, N) # 克隆编码器层(N个)
self.norm = LayerNorm(layer.d_model) # 层规范化
def forward(self, x, mask):
for layer in self.layers:
x = layer(x, mask)
return self.norm(x)
# 解码器
class Decoder(nn.Module):
def __init__(self, layer, N):
super().__init__()
self.layers = clones(layer, N) # 克隆解码器层(N个)
self.norm = LayerNorm(layer.d_model) # 层规范化
def forward(self, x, encoder_output, source_mask, target_mask):
for layer in self.layers:
x = layer(x, encoder_output, source_mask, target_mask)
return self.norm(x)模型搭建
# Transformer 模型构建
class EncoderDecoder(nn.Module):
    def __init__(self, source_embed, encoder, target_embed, decoder, generator):
        super().__init__()
        self.source_embed = source_embed    # 源语言嵌入
        self.encoder = encoder              # 编码器
        self.target_embed = target_embed    # 目标语言嵌入
        self.decoder = decoder              # 解码器
        self.generator = generator          # 输出层

    def forward(self, source_x, target_y, source_mask, target_mask):
        """
        Transformer 前向传播,先编码,再解码
        :param source_x: 编码器输入 [batch_size, sen_len]
        :param target_y: 解码器输入 [batch_size, sen_len]
        :param sorce_mask: 源语言掩码张量,padding_mask 填充掩码,防止填充的pad子影响注意力计算
        :param target_mask: 目标语言掩码张量,sentence_mask 句子掩码,防止未来的信息被提前利用
        :return: 模型预测结果(概率分布结果) [batch_size, sen_len, vocab_size]
        """
        encoder_output = self.encode(source_x, source_mask)
        decoder_output = self.decode(target_y, encoder_output, source_mask, target_mask)
        return self.generator(decoder_output)

    def encode(self, source_x, source_mask):
        return self.encoder(self.source_embed(source_x), source_mask)

    def decode(self, target_y, encoder_output, source_mask, target_mask):
        # encoder_output: 编码器输出
        return self.decoder(self.target_embed(target_y), encoder_output, source_mask, target_mask)


# 输出部分:线性层 + 激活层
class Generator(nn.Module):
    def __init__(self, d_model, vocab_size):
        super().__init__()
        self.fc = nn.Linear(d_model, vocab_size)  # 线性层

    def forward(self, x):
return F.log_softmax(self.fc(x), dim=-1)# 测试模型
def model_construction():
c = copy.deepcopy
d_model = 512
droput_p = 0.2
# 编码部分
source_embed = Embedding(vocab_size=1000, embed_dim=d_model) # 词嵌入
source_pos_encoding = PositionalEncoding(d_model, dropout=0.1) # 位置编码
multi_head_attn = MultiHeadAttention(d_model, num_heads=8) # 多头注意力层
feed_forward = FeedForward(d_model, d_ff=2048) # 前馈全连接层
encoder_layer = EncoderLayer(d_model, multi_head_attn, feed_forward, droput_p) # 编码器层
encoder = Encoder(encoder_layer, N=6)
# 解码部分
target_embed = c(source_embed) # 词嵌入
target_pos_encoding = c(source_pos_encoding) # 位置编码
mask_attn = c(multi_head_attn) # 掩码多头注意力层
attn = c(multi_head_attn) # 多头注意力层
ff = c(feed_forward)
decoder_layer = DecoderLayer(d_model, mask_attn, attn, ff, droput_p)
decoder = Decoder(decoder_layer, N=6)
# 输出部分
generator = Generator(d_model, vocab_size=1000)
# 模型搭建
model = EncoderDecoder(
nn.Sequential(source_embed, source_pos_encoding),
encoder,
nn.Sequential(target_embed, target_pos_encoding),
decoder,
generator
)
print(f"模型结构: {model}")
# 模型前向测试
source_x = torch.LongTensor([[1, 3, 5, 7],[2, 4, 6, 8]])
target_y = torch.LongTensor([[0, 1, 3, 5],[1, 2, 4, 6]])
source_mask = torch.zeros(8, 4, 4)
target_mask = c(source_mask)
output = model(source_x, target_y, source_mask, target_mask)
print(f"模型输出: {output.shape}")
if __name__ == '__main__':
model_construction()输出:
模型结构: EncoderDecoder(
  (source_embed): Sequential(  # 输入层(编码器)
    (0): Embedding(  # 词嵌入
      (embedding): Embedding(1000, 512)
    )
    (1): PositionalEncoding(  # 位置编码
      (dropout): Dropout(p=0.1, inplace=False)
    )
  )
  (encoder): Encoder(  # 编码器
    (layers): ModuleList(
      (0-5): 6 x EncoderLayer(  # 编码器层
        (attn_obj): MultiHeadAttention(  # 多头注意力
          (linears): ModuleList(
            (0-3): 4 x Linear(in_features=512, out_features=512, bias=True)
          )
          (dropout): Dropout(p=0.1, inplace=False)
        )
        (feed_forward): FeedForward(  # 前馈全连接层
          (fc1): Linear(in_features=512, out_features=2048, bias=True)
          (fc2): Linear(in_features=2048, out_features=512, bias=True)
          (dropout): Dropout(p=0.1, inplace=False)
        )
        (sublayer): ModuleList(  # 层规范化 + 残差连接
          (0-1): 2 x SublayerConnection(
            (norm): LayerNorm((512,), eps=1e-05, elementwise_affine=True)
            (dropout): Dropout(p=0.2, inplace=False)
          )
        )
      )
    )
    (norm): LayerNorm()
  )
  (target_embed): Sequential(  # 输入层(解码器)
    (0): Embedding(
      (embedding): Embedding(1000, 512)
    )
    (1): PositionalEncoding(
      (dropout): Dropout(p=0.1, inplace=False)
    )
  )
  (decoder): Decoder(  # 解码器
    (layers): ModuleList(
      (0-5): 6 x DecoderLayer(  # 解码器层
        (mask_attn): MultiHeadAttention(  # 多头自注意力(sentence-mask)
          (linears): ModuleList(
            (0-3): 4 x Linear(in_features=512, out_features=512, bias=True)
          )
          (dropout): Dropout(p=0.1, inplace=False)
        )
        (attn): MultiHeadAttention(  # 多头注意力(padding-mask)
          (linears): ModuleList(
            (0-3): 4 x Linear(in_features=512, out_features=512, bias=True)
          )
          (dropout): Dropout(p=0.1, inplace=False)
        )
        (feed_forward): FeedForward(  # 前馈全连接层
          (fc1): Linear(in_features=512, out_features=2048, bias=True)
          (fc2): Linear(in_features=2048, out_features=512, bias=True)
          (dropout): Dropout(p=0.1, inplace=False)
        )
        (sublayer): ModuleList(  # 层规范化 + 残差连接
          (0-2): 3 x SublayerConnection(
            (norm): LayerNorm((512,), eps=1e-05, elementwise_affine=True)
            (dropout): Dropout(p=0.2, inplace=False)
          )
        )
      )
    )
    (norm): LayerNorm()
  )
  (generator): Generator(  # 输出层
    (fc): Linear(in_features=512, out_features=1000, bias=True)
  )
)
模型输出: torch.Size([2, 4, 1000])
Transformers 库使用
Huggingface Transformers 是一个开源基于 transformer 模型结构提供的预训练语言库。它支持 Pytorch,Tensorflow2.0,并且支持两个框架的相互转换。 Transformers 提供了NLP领域大量state-of-the-art(state-of-the-art) 的 预训练语言模型结构的模型和调用框架。 Transformer 社区:https://huggingface.co/
安装 Transformers 库
conda search transformers  # 查看可安装版本
pip install transformers==4.57.1
pip install datasets
相关概念
- 带头任务头输出 和 不带任务头输出:
- 带头任务头输出:在基座模型之上添加了一个分类头,模型直接输出 预测标签和概率分数(如
{'label': 'POSITIVE', 'score': 0.998}),通常直接用于推理 例如:文本分类,完型填空等任务 - 不带任务头输出:只加载基座模型,模型仅输出高维特征向量(如
last_hidden_state),需要额外添加任务层(任务头)才能得到具体预测结果。 例如:特征提取
- 带头任务头输出:在基座模型之上添加了一个分类头,模型直接输出 预测标签和概率分数(如
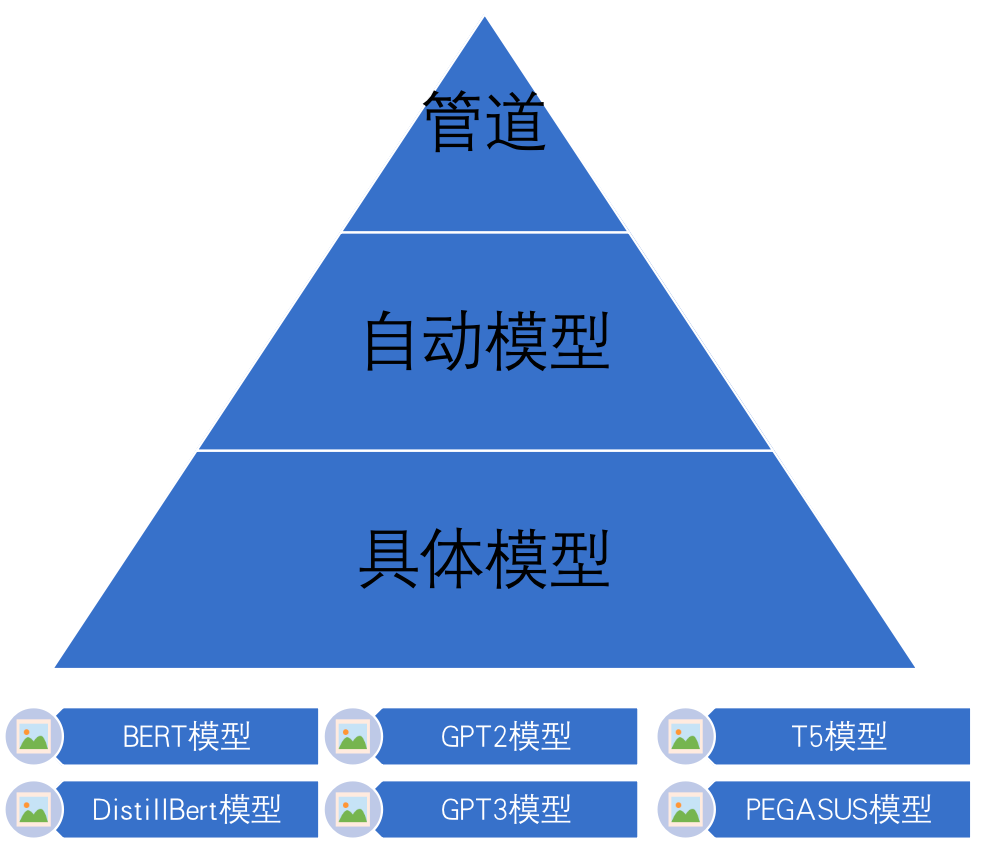
Transformers库三层应用结构
- 管道(Pipline)方式:高度集成的极简使用方式,只需要几行代码即可实现一个NLP任务。
- 自动模型(AutoMode)方式:可载入并使用BERTology系列模型。
- 具体模型(SpecificModel)方式:在使用时,需要明确指定具体的模型,并按照每个BERTology系列模型中的特定参数进行调用,该方式相对复杂,但具有较高的灵活度。
NLP 任务
- 文本分类 任务 文本分类是指模型可以根据文本中的内容来进行分类。一般是通过有监督训练得到的,文本内容的具体分类,依赖于训练时所使用的样本标签。
- 特征提取 任务 特征抽取任务只返回文本处理后的特征,属于预训练模型的范畴。特征抽取任务的输出结果需要和其他模型一起工作。
- 完形填空 任务 完型填空任务又被叫做“遮蔽语言建模任务”,它属于BERT模型训练过程中的子任务。
- 阅读理解 任务 阅读理解任务又称为“抽取式问答任务”,即输入一段文本和一个问题,让模型输出结果。
- 文本摘要 任务 输入一段文本,输出一段概况、简单的文字。
- NER 任务 命名实体识别(NER),识别文本中的人名(PER)、地名(LOC)、组织(ORG)以及其他实体(MISC)等。其本质上是一个分类任务(又叫序列标注任务),实体词识别是句法分析的基础,而句法分析优势NLP任务的核心。
管道方式
import numpy as np
from transformers import pipeline  # 管道
from huggingface_hub import snapshot_download  # 下载huggingface中的模型
文本分类 任务
python# 情感分类 def sentiment_classification(): # 下载模型 snapshot_download(repo_id="techthiyanes/chinese_sentiment", local_dir="./model/transformers/chinese_sentiment") # 加载模型,task:任务类型,model:指定本地模型路径(联网的情况下可自动加载模型对应的分词器) model = pipeline(task="sentiment-analysis", model="./model/transformers/chinese_sentiment") # 情感分析 print(model("我爱北京天安门,天安门上太阳升!")) # [{'label': 'star 5', 'score': 0.6905773878097534}] print(model("这个模型真难用,简直是垃圾!")) # [{'label': 'star 1', 'score': 0.7544621229171753}] sentiment_classification()特征提取 任务
python# 特征提取 def feature_extraction(): # 下载模型 snapshot_download(repo_id="bert-base-chinese", local_dir="./model/transformers/bert-base-chinese") # 加载模型,task:任务类型,model:指定本地模型路径(联网的情况下,直接写模型 ID 可自动下载模型) model = pipeline(task="feature-extraction", model="./model/transformers/bert-base-chinese") # 特征提取 output = model('人生该如何起头') print(np.array(output).shape, output) # (1, 9, 768), bert会添加 CLS和SEP 标记,所以原本7个词变为9个词 feature_extraction()完形填空 任务
python# 完形填空 def fill_mask(): # 下载模型 snapshot_download(repo_id="hfl/chinese-bert-wwm", local_dir="./model/transformers/chinese-bert-wwm") # 加载模型,task:任务类型,model:指定本地模型路径(联网的情况下,直接写模型 ID 可自动下载模型) model = pipeline(task="fill-mask", model="./model/transformers/chinese-bert-wwm") # 模型预测 output = model('我想明天去[MASK]吃饭。') # 一次只能预测1个MASK(1个MASK只能填一个词) print(output) ''' [{'score': 0.1494479775428772, 'token': 872, 'token_str': '你', 'sequence': '我 想 明 天 去 你 吃 饭 。'}, {'score': 0.14547568559646606, 'token': 6929, 'token_str': '那', 'sequence': '我 想 明 天 去 那 吃 饭 。'}, {'score': 0.14154349267482758, 'token': 2157, 'token_str': '家', 'sequence': '我 想 明 天 去 家 吃 饭 。'}, {'score': 0.09529270976781845, 'token': 1343, 'token_str': '去', 'sequence': '我 想 明 天 去 去 吃 饭 。'}, {'score': 0.07865447551012039, 'token': 1961, 'token_str': '她', 'sequence': '我 想 明 天 去 她 吃 饭 。'}] ''' fill_mask()阅读理解 任务
python# 阅读理解 def question_answering(): # 下载模型 snapshot_download(repo_id="luhua/chinese_pretrain_mrc_roberta_wwm_ext_large", local_dir="./model/transformers/chinese_pretrain_mrc_roberta_wwm_ext_large") # 加载模型,task:任务类型,model:指定本地模型路径(联网的情况下,直接写模型 ID 可自动下载模型) model = pipeline('question-answering', model="./model/transformers/chinese_pretrain_mrc_roberta_wwm_ext_large") # 模型预测 context = "我是一个中国学生,我叫王伟伟,我的喜好是写代码" questions = ["我叫什么名字", "我来自哪里", "我的爱好是什么"] print(model(context=context, question=questions)) """ [{'score': 0.21465566754341125, 'start': 11, 'end': 14, 'answer': '王伟伟'}, {'score': 2.781756620606757e-07, 'start': 4, 'end': 6, 'answer': '中国'}, {'score': 0.17819717526435852, 'start': 20, 'end': 23, 'answer': '写代码'}] """ question_answering()文本摘要 任务
python# 文本摘要 def summarization(): # 下载模型 snapshot_download(repo_id="sshleifer/distilbart-cnn-12-6", local_dir="./model/transformers/distilbart-cnn-12-6") # 加载模型,task:任务类型,model:指定本地模型路径(联网的情况下,直接写模型 ID 可自动下载模型) model = pipeline('summarization', model="./model/transformers/distilbart-cnn-12-6") # 模型预测 text = "BERT is a transformers model pretrained on a large corpus of English data " \ "in a self-supervised fashion. This means it was pretrained on the raw texts " \ "only, with no humans labelling them in any way (which is why it can use lots " \ "of publicly available data) with an automatic process to generate inputs and " \ "labels from those texts. More precisely, it was pretrained with two objectives:Masked " \ "language modeling (MLM): taking a sentence, the model randomly masks 15% of the " \ "words in the input then run the entire masked sentence through the model and has " \ "to predict the masked words. This is different from traditional recurrent neural " \ "networks (RNNs) that usually see the words one after the other, or from autoregressive " \ "models like GPT which internally mask the future tokens. It allows the model to learn " \ "a bidirectional representation of the sentence.Next sentence prediction (NSP): the models" \ " concatenates two masked sentences as inputs during pretraining. Sometimes they correspond to " \ "sentences that were next to each other in the original text, sometimes not. The model then " \ "has to predict if the two sentences were following each other or not." print(model(text)) # [{'summary_text': ' BERT is a transformers model pretrained on a large corpus of English data in a self-supervised fashion . # It was pretrained with two objectives: Masked language modeling (MLM) and next sentence prediction (NSP) This allows the model to learn a bidirectional representation of the sentence .'}] summarization()NER 任务
python# 命名实体识别 def ner(): # 下载模型 snapshot_download(repo_id="uer/roberta-base-finetuned-cluener2020-chinese", local_dir="./model/transformers/roberta-base-finetuned-cluener2020-chinese") # 加载模型,task:任务类型,model:指定本地模型路径(联网的情况下,直接写模型 ID 可自动下载模型) model = pipeline('ner', model="./model/transformers/roberta-base-finetuned-cluener2020-chinese") # 模型预测 print(model('我是一个中国学生,我叫王伟伟,我的喜好是写代码。')) """ [{'entity': 'B-position', 'score': np.float32(0.6719871), 'index': 7, 'word': '学', 'start': 6, 'end': 7}, {'entity': 'I-position', 'score': np.float32(0.94930494), 'index': 8, 'word': '生', 'start': 7, 'end': 8}, {'entity': 'B-name', 'score': np.float32(0.98282826), 'index': 12, 'word': '王', 'start': 11, 'end': 12}, {'entity': 'I-name', 'score': np.float32(0.9825546), 'index': 13, 'word': '伟', 'start': 12, 'end': 13}, {'entity': 'I-name', 'score': np.float32(0.9771797), 'index': 14, 'word': '伟', 'start': 13, 'end': 14}] """ # 前缀:B-开头,I-内容, # position: 职位(身份),name: 名字 ner()
自动模型
import torch
# 若本地没有模型,库会自动从 Hugging Face Hub 下载所需的文件
from transformers import AutoConfig, AutoModel, AutoTokenizer  # 自动配置模型参数,自动加载模型,自动加载和模型匹配的分词器
from transformers import (AutoModelForSequenceClassification, # 文本分类
                          AutoModelForMaskedLM,               # 掩码语言模型
                          AutoModelForQuestionAnswering,      # 问答模型
                          AutoModelForSeq2SeqLM,              # 文本摘要(序列到序列语言模型)
                          AutoModelForTokenClassification     # 命名实体识别(token分类)
                          )
from rich import print  # 终端打印美化
文本分类 任务
python# 情感分类 def sentiment_classification(): # 模型加载 model_ID = "./model/transformers/chinese_sentiment" # 模型路径 或 模型 ID tokenizer = AutoTokenizer.from_pretrained(model_ID) # 加载Tokenizer(分词器) model = AutoModelForSequenceClassification.from_pretrained(model_ID) # 加载文本分类模型(序列分类) # 模型文本 text = "我很开心,今天天气不错" # 编码文本:文本 -> torch # text: (待编码的)文本,return_tensors: 返回的类型(默认:list,pt:pytorch,tf:tensorflow,np:numpy) # padding: 填充方式(max_length:填充到最大长度,longest,do_not_pad),truncation: 是否截断(True:截断),max_length: (输入)最大长度 input_ids = tokenizer.encode(text=text, return_tensors="pt", padding="max_length", truncation=True, max_length=10) # 模型评估(推理模式) model.eval() # 模型预测 output1 = model(input_ids) output2 = model(input_ids, return_dict=False) print(output1) # 返回:SequenceClassifierOutput(loss: 损失函数,logits: 预测结果,hidden_states: 隐藏状态, attentions: 注意力权重) print(output2) # 预测结果 tensor([[-1.8934, -0.4941, -0.1015, 0.1196, 0.4722]], grad_fn=<AddmmBackward0>) print(output1.logits) # 预测结果 tensor([[-1.8934, -0.4941, -0.1015, 0.1196, 0.4722]], grad_fn=<AddmmBackward0>) sentiment_classification()特征提取 任务
python# 特征提取 def feature_extraction(): # 模型加载 model_ID = "./model/transformers/bert-base-chinese" # 模型路径 或 模型 ID tokenizer = AutoTokenizer.from_pretrained(model_ID) # 加载Tokenizer(分词器) model = AutoModel.from_pretrained(model_ID) # 加载模型 # 模型文本 text1 = ["人生该如何起头", "人生如何开始"] text2 = ["人生如何开始", "人生应该如何开始"] # 编码文本:文本 -> torch # text: (待编码的)文本,return_tensors: 返回的类型(默认:list,pt:pytorch,tf:tensorflow,np:numpy) # padding: 填充方式(max_length:填充到最大长度,longest,do_not_pad),truncation: 是否截断(True:截断),max_length: (输入)最大长度 inputs = tokenizer(text1, text2, return_tensors="pt", padding="max_length", truncation=True, max_length=20) print(inputs) # {'input_ids': 文本的编码结果,'token_type_ids':段落标记 / 句子对标记,'attention_mask': 填充标记(0-填充)} # 模型评估(推理模式) model.eval() # 模型预测 outputs = model(**inputs) print(outputs) # 返回:BaseModelOutputWithPoolingAndCrossAttentions() print(outputs.last_hidden_state.shape) # 最后的隐藏状态 (2, 10, 768) [batch_size, sequence_length, hidden_size] print(outputs.pooler_output.shape) # 池化后的隐藏状态 (2, 768) [batch_size, hidden_size] feature_extraction()完形填空 任务
python# 完形填空 def fill_mask(): # 模型加载 model_ID = "./model/transformers/chinese-bert-wwm" # 模型路径 或 模型 ID tokenizer = AutoTokenizer.from_pretrained(model_ID) # 加载Tokenizer(分词器) model = AutoModelForMaskedLM.from_pretrained(model_ID) # 加载掩码语言模型 # 编码文本:文本 -> torch # text: (待编码的)文本,return_tensors: 返回的类型(默认:list,pt:pytorch,tf:tensorflow,np:numpy) # padding: 填充方式(max_length:填充到最大长度,longest,do_not_pad),truncation: 是否截断(True:截断),max_length: (输入)最大长度 inputs = tokenizer("我想现在去[MASK]家吃饭", return_tensors="pt", padding="max_length", truncation=True, max_length=15) # print(inputs) # {'input_ids': 文本的编码结果,'token_type_ids':段落标记 / 句子对标记,'attention_mask': 填充标记(0-填充)} # 模型评估(推理模式) model.eval() # 模型预测 outputs = model(**inputs) # print(outputs) # 返回 MaskedLMOutput 对象,logits: 预测结果 # print(outputs.logits.shape, outputs.logits) # [1, 15, 21128] # 获取 [MASK] 的预测结果 prediction = torch.argmax(outputs.logits[0][6]).item() # 预测结果索引 prediction = tokenizer.decode([prediction]) # 索引 -> 文本 # prediction_list = prediction.convert_ids_to_tokens(prediction) # ['你'] print(f"预测结果为:{prediction}") # 你 fill_mask()阅读理解 任务
python# 阅读理解 def question_answering(): # 模型加载 model_ID = "./model/transformers/chinese_pretrain_mrc_roberta_wwm_ext_large" # 模型路径 或 模型 ID tokenizer = AutoTokenizer.from_pretrained(model_ID) # 加载Tokenizer(分词器) model = AutoModelForQuestionAnswering.from_pretrained(model_ID) # 加载问答模型 # 编码文本:文本 -> torch context = "我是一个中国学生,我叫王伟伟,我的喜好是写代码" questions = ["我叫什么名字", "我来自哪里", "我的爱好是什么"] # 模型预测 model.eval() for question in questions: # text: (待编码的)文本,return_tensors: 返回的类型(默认:list,pt:pytorch,tf:tensorflow,np:numpy) inputs = tokenizer(question, context, return_tensors="pt") outputs = model(**inputs) # 标识输入序列中哪些位置属于“上下文(context)” context_mask = inputs['token_type_ids'][0] == 1 # 把问题区的分数设为负无穷(掩码处理),避免答案来自问题部分 start_logits, end_logits = outputs.start_logits, outputs.end_logits start_logits[0][~context_mask] = -float('inf') end_logits[0][~context_mask] = -float('inf') start_idx, end_idx = torch.argmax(outputs.start_logits), torch.argmax(outputs.end_logits) + 1 answer = tokenizer.decode(inputs['input_ids'][0][start_idx:end_idx], skip_special_tokens=True) print(f"问题: {question}\n答案: {answer}\n") question_answering()文本摘要 任务
python# 文本摘要 def summarization(): # 模型加载 model_ID = "./model/transformers/distilbart-cnn-12-6" # 模型路径 或 模型 ID tokenizer = AutoTokenizer.from_pretrained(model_ID) # 加载Tokenizer(分词器) model = AutoModelForSeq2SeqLM.from_pretrained(model_ID) # 加载序列到序列语言模型 # 编码文本:文本 -> torch text = "BERT is a transformers model pretrained on a large corpus of English data " \ "in a self-supervised fashion. This means it was pretrained on the raw texts " \ "only, with no humans labelling them in any way (which is why it can use lots " \ "of publicly available data) with an automatic process to generate inputs and " \ "labels from those texts. More precisely, it was pretrained with two objectives:Masked " \ "language modeling (MLM): taking a sentence, the model randomly masks 15% of the " \ "words in the input then run the entire masked sentence through the model and has " \ "to predict the masked words. This is different from traditional recurrent neural " \ "networks (RNNs) that usually see the words one after the other, or from autoregressive " \ "models like GPT which internally mask the future tokens. It allows the model to learn " \ "a bidirectional representation of the sentence.Next sentence prediction (NSP): the models" \ " concatenates two masked sentences as inputs during pretraining. Sometimes they correspond to " \ "sentences that were next to each other in the original text, sometimes not. The model then " \ "has to predict if the two sentences were following each other or not." inputs = tokenizer(text, return_tensors="pt") # 返回:inputs_ids, attention_mask # 模型预测 model.eval() model_outputs = model.generate(inputs['input_ids']) # shape=[[1, 84]] # 解码文本:torch -> 文本 # skip_special_tokens:是否跳过特殊标记,clean_up_tokenization_spaces:是否清理分词空格 outputs = tokenizer.decode(model_outputs[0], skip_special_tokens=True, clean_up_tokenization_spaces=False) print(f"摘要结果:{outputs}") summarization()NER 任务
python# 命名实体识别 def ner(): # 模型加载 model_ID = "./model/transformers/roberta-base-finetuned-cluener2020-chinese" # 模型路径 或 模型 ID config = AutoConfig.from_pretrained(model_ID) # 加载模型配置 tokenizer = AutoTokenizer.from_pretrained(model_ID) # 加载Tokenizer(分词器) model = AutoModelForTokenClassification.from_pretrained(model_ID) # 加载命名实体识别模型(token分类) # 编码文本 inputs = tokenizer("我是一个中国学生,我叫王伟伟,我的喜好是写代码。", return_tensors="pt") # 分词并编码 # print(inputs) # {'input_ids', 'attention_mask', 'token_type_ids'} # 模型预测 model.eval() model_outputs = model(inputs['input_ids']).logits # shape: [1, seq_len, num_labels] -> [1, 26, 32] # 模型输出:提取每个 token 对应的实体标签 input_tokens = tokenizer.convert_ids_to_tokens(inputs['input_ids'][0]) # ids -> tokens vocab_index = model_outputs[0].argmax(-1) # 每个 token 的预测标签索引:[1, seq_len, num_labels] -> [seq_len] ouputs = [] for i, (label_idx, token) in enumerate(zip(vocab_index, input_tokens)): if token in tokenizer.all_special_tokens: # 忽略特殊字符 continue # config.id2label:id -> label,item():torch -> int ouputs.append({'entity': config.id2label[label_idx.item()], 'index':i, 'word': token}) print(ouputs) ner()
具体模型
完形填空 任务
pythonimport torch # 若本地没有模型,库会自动从 Hugging Face Hub 下载所需的文件 from transformers import BertTokenizer, BertForMaskedLM # BERT分词器, BERT掩码语言模型 # 美化输出 from rich import print # 完形填空 def fill_mask(): # 模型加载 model_ID = "./model/transformers/chinese-bert-wwm" # 模型路径 或 模型 ID tokenizer = BertTokenizer.from_pretrained(model_ID) # 加载Tokenizer(分词器) model = BertForMaskedLM.from_pretrained(model_ID) # 加载BERT掩码语言模型 # 编码文本:文本 -> torch # text: (待编码的)文本,return_tensors: 返回的类型(默认:list,pt:pytorch,tf:tensorflow,np:numpy) inputs = tokenizer("我想现在去[MASK]家吃饭", return_tensors="pt") # print(inputs) # {'input_ids': 文本的编码结果,'token_type_ids':段落标记 / 句子对标记,'attention_mask': 填充标记(0-填充)} # 模型评估(推理模式) model.eval() # 模型预测 outputs = model(**inputs) # print(outputs) # 返回 MaskedLMOutput 对象,logits: 预测结果 # print(outputs.logits.shape, outputs.logits) # [1, 15, 21128] # 获取 [MASK] 的预测结果 prediction = torch.argmax(outputs.logits[0][6]).item() # 预测结果索引 prediction = tokenizer.decode([prediction]) # 索引 -> 文本 # prediction_list = prediction.convert_ids_to_tokens(prediction) # ['你'] print(prediction) # 你 fill_mask()